Computer batteries are essential components that greatly affect computer performance. Therefore, it is important to regularly check the health of your computer's battery and take necessary actions to maintain it or replace it if needed.
In this article, we will learn how to check the health of
Windows computer batteries by creating a Battery Report. A Battery Report is a report that contains data about the current battery performance, allowing you to monitor the decrease in battery capacity and other information.
Here's how to create a Battery Report in Windows 10 and Windows 11: How to create a battery report in Windows 10 and Windows 11:
Whether your computer is running on Windows 10 or Windows 11, you can create a battery report on your computer by following these steps:
1.Click on the Start icon, then select Windows PowerShell (Admin) from the menu that appears. A pop-up window may appear asking for permission to make changes to your computer, click on the Yes button.
2.A
PowerShell window will appear where you are allowed to enter commands to automate certain tasks.
3.Write: (powercfg /batteryreport /output "C:\battery-report.html") in the window and press the Enter key to execute the command.
4. In PowerShell, the name of the file containing the battery health report and its location on your computer will be displayed. The file name will be "
battery-report.html" and it will be saved on the C drive.
5.Close PowerShell.
6.Open File Explorer and navigate to the C drive in Windows 10. If your computer is running on Windows 11, navigate to "This PC" and click on OS (C:).
7.You will find the battery report saved as an HTML file named "battery-report.html."
8. Double-click on the file to open it in a web browser.
View Battery Report.
The report will determine the health of your computer's battery, how well it is performing, and how long it lasts. At the top of the battery report, you'll see basic information about your computer, followed by battery specifications.
In the "Recent Usage" section, a table will appear showing you the duration of time during which your computer has been running on battery power or being used while connected to a power source over the past three days.
The "Battery Capacity History" section illustrates how the charging capacity has changed over time. On the right-hand side, the original charging capacity of your computer's battery is displayed, while on the left-hand side, you can see the current full charging capacity of your computer's battery, which is likely to decrease over time as you use your device more.
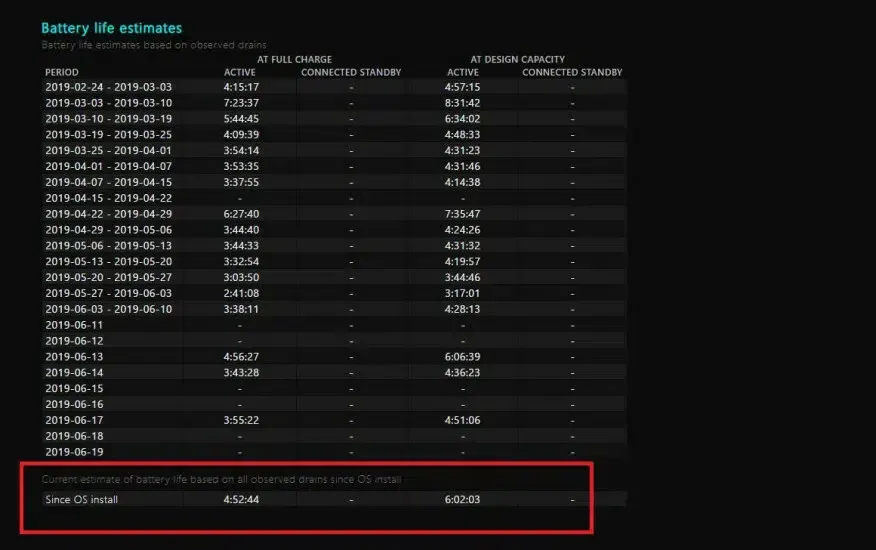
In the "Battery Life Estimates" section, located on the right-hand side, you will find how long your battery should last based on its capacity, and on the left-hand side, you will see how long it will actually last when fully charged.
At the bottom of the report, you will find an estimate of the current battery life, and in the example shown in the image, the computer will last for 6 hours, 2 minutes, and 3 seconds based on the battery's capacity, but it is currently expected to last for 4 hours, 52 minutes, and 44 seconds.


